|
|
|
|
|
Benefits of the STEALTH I charging system include:
UNLIMITED TROLLING TIME – Want the option of staying on the water and staying in the current without worrying about losing power to your trolling motor? If so, the STEALTH I is for you. As a result of new-patented technology, the STEALTH I charging system let’s you stay on the water and troll as long as you want. Basically taking adequate power from your alternator but never getting into your motors electrical system. Bottom line - you’ll have the ability and the confidence to fish when and where your competitors cannot!
LIGHTWEIGHT AND COMPACT – Do you want less weight and more storage room in your boat (translation – MORE SPEED)? If so, it’s time to replace the heavy AC battery chargers of the past with the lightweight STEALTH I charging system. The STEALTH I weighs a meager 3.5 lbs and is smaller than your average cigar box (6.5” x 6.25” x 1.65”). And with the new addition of the Stealth technology based ACs in the Pro series total weight 11 lbs
ELIMINATE “DEEP CYCLE” DISCHARGING – Your batteries’ worst enemy – “deep cycle” discharging – is a thing of the past as a result of the STEALTH I Smart Charging Circuit™ and patented continuous charging technology.
VERSATILITY – Unlike limited battery chargers of the past, the STEALTH I can be used with virtually any boat or trolling motor configuration.
WEATHERPROOF – The STEALTH I is completely weatherproof. This translates into reliability and dependability, both of which mean you will have the added confidence to stay on the water when conditions may not be at their best.
GOLD-PLATED CONNECTIONS – The STEALTH I charging system comes complete with gold-plated cable connectors (charger side) to ensure maximum efficiency.
EXTENDED BATTERY LIFE – Hard as it may seem to believe, recent tests have shown that the STEALTH I charging system actually extends the life of your expensive marine batteries (but don’t tell your battery manufacturer).
|
|
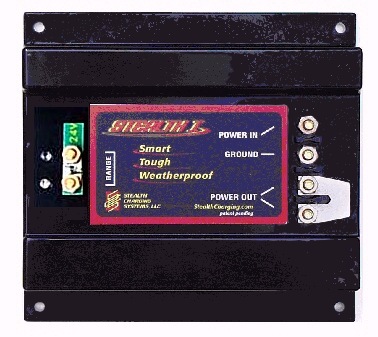
FIGURE # 1 |
IMPORTANT MESSAGE:
Before proceeding to install your STEALTH I charging system, READ THE INSTRUCTIONS COMPLETELY, regardless of your familiarity with electricity or electrical systems. While the Stealth I is simple to install, it is a completely different concept (innovated) and it does require basic knowledge of electricity, and you MUST FOLLOW the instructions contained in this manual. Any questions please call Tech Support at 888-588-4506.............................. click on the picture to open the owners manual
|
|
NOTE: THE STEALTH DC IS SHIPPED READY FOR INSTALLATION AS “OPTION 1” (24VDC SYSTEM).
|
|
NOTE – GROUND (NEGATIVE) IS COMMON FOR SUPPLYING THE CRANKING BATTERY AND TROLLING MOTOR BATTERIES IN ALL CONFIGURATIONS. ALWAYS WEAR SAFETY GLASSES WHEN WORKING WITH BATTERIES!
|
|
The Stealth I charging system gets its power directly from your engine’s cranking battery. When in operation, state-of-the-art technology applies on-demand charging voltage to your marine trolling batteries so they receive only the charging current required to replace energy used by your trolling motor. The Stealth I Smart Charging Circuit™ design works to ensure that your cranking battery voltage will not fall below 13.0 VDC, (+ or - .1 VDC). Thus providing plenty of stand-by power to start your engine. The Stealth I also works to prevent “over-charging” of your trolling batteries by monitoring output voltage and then automatically switching off when optimum charging is complete. The Stealth I system is versatile and can be used with many battery configuration options: The Stealth unit has systems handling 8 & 10 batteries.
STEP 1: RANGE TERMINALS. The Stealth I charging system utilizes two voltage range terminals which can be set for different voltage outputs depending on your trolling motor system requirements. These two voltage terminals are the two screws marked RANGE on the left-hand side of the Stealth I label right below the LED lights (the “Range Terminals”) the words could be hide on the label by the jumper being in place (already on the terminals) preset on shippment @ 24 VDC.
IMPORTANT: If you are unsure what your system requirements are, contact your boat manufacturer, consult your owner’s manual, contact your local marina or boat mechanic, or contact Stealth Customer Service (888-588-4506).
|
|
|
As mentioned and shown in Figure 1 above, the Stealth I is shipped with the Range Terminals already connected together by a 24V jumper (the “24V Range Jumper”). The Stealth I system becomes 36 volt system when the jumper is removed leaving the 2 terminals bear.
|
|
|
STEP 2: POWER OUT TERMINALS. The Stealth I charging system also utilizes two independent isolated voltage outputs. These two outputs are the two terminal screws marked POWER OUT on the lower right-hand side of the Stealth I label (the “Power Out”). As shown in Figure 1 above, the Power Out Terminals are already connected together by a jumper (the “Power Out Jumper”).
|
|
|
IMPORTANT: Please note that if you desire to utilize OPTION 4 or OPTION 5, the Stealth I may require additional cooling of the base, if the energy transfer through the Stealth I exceeds 500W over a longer period of time.
|
|
STEP 3: INSTALLING THE Stealth I UNIT. AFTER completing STEP 1 and STEP 2 above, take the following additional steps to physically install your Stealth I charging system:
FIRST: Check all items supplied with the Stealth I charging system. A list of all components is contained on a separate page in the accessory package.
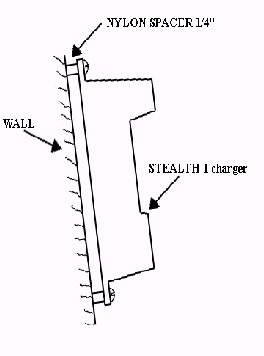
SECOND: Mount the Stealth I unit in an area that is the least likely to be flooded or submerged. BE SURE and insert the one-quarter inch (Ľ”) nylon spacers between the bottom of the Stealth I and the mounting surface. A vertical mounting position is preferred (See Figure 2).
THIRD: Unplug your trolling motor if it is equipped with plug. If your trolling motor is “hard wired” to your electrical system, then disconnect the jumper between your trolling batteries.
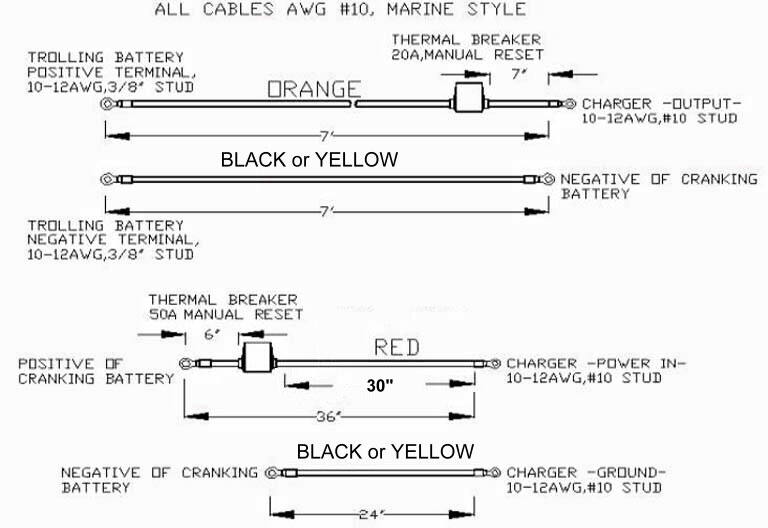
FOURTH: Using the two foot (2’) Black Cable supplied with your Stealth I system, connect one end of the cable to the NEGATIVE terminal on your cranking battery and connect the other end of the Black Cable to the Stealth I terminal marked GROUND on the right hand side of the Stealth I label.
FIFTH: Using the seven foot (7’) Black Cable supplied with your Stealth I system, connect one end of the cable to NEGATIVE terminal on your cranking battery and connect the other end of the Black Cable to the NEGATIVE terminal of your trolling motor battery.
SIXTH: Using the seven foot (7’) Orange Cable supplied with your Stealth I system, connect one end of the cable to the either of the two POWER OUT terminals located on the lower right hand side of the Stealth I label and connect the other end of the Orange Cable to the POSITIVE terminal of your trolling motor battery.
|
|
SEVENTH: Plug in your trolling motor or re-install the jumper between your trolling batteries.
EIGHTH: Before, you power up the STEALTH I, make sure you are still wearing safety glasses!. Then, using the two foot (2’) Red Cable with inline 40A or 50A breaker supplied with your Stealth I system, connect one end of the Red Cable to the POSITIVE terminal on your cranking battery and connect the other end of the Red Cable to the Stealth I terminal marked POWER IN located on the upper right hand side of the Stealth I label. If the main toggle switch is ON, then both LED in -Range- terminals will light up. The -GREEN- Range Terminal light indicates that the Stealth I is ON and the -RED- Range Terminal light indicates that the Stealth I is READY or is CHARGING. Whether the Stealth I is READY or is CHARGING depends on the amount of available supplying voltage. If the voltage of cranking battery is above 13.3VDC, then the Stealth I is already charging your trolling motor batteries and will continue to do so until the supply voltage descends to 12.7VDC at which time the Stealth I automatically switches off. When your engine is running, the voltage of the cranking battery will reach 13.3VDC in a very short time (unless the battery has a bad cell or short cell) at which time the Stealth I will begin charging your trolling motor batteries.
NINTH: Check the accuracy of all connections and the tightness and contact of those connections one more time as you compare your installation to the appropriate circuit diagram.
TENTH: Check the functionality of the toggle switch by switching ON and OFF while observing the Range Terminal lights on the Stealth I.
|
|
|
Install Preference:
Install the Stealth I on the side walls or at a tilt as pictured
|
|
|
IMPORTANT REMINDERS:
IMPORTANT: Check all terminal connections to be good and tight (DON'T OVER TIGHTEN). Cover with light grease, which protects against oxidation and corrosion. IMPORTANT: Nylon acorn nuts should be applied to protect from arching on the in-put, ground and the 2 out-put post of the DC unit. IMPORTANT: Connect the 12 volt 110AC charger to your cranking battery only, when you plug in the AC you will charge all batteries together. IMPORTANT: Periodically checking your batteries connections to be tight and water levels to be at the appropriately levels. This is essential for achieving maximum performance from your batteries. At least twice a year you should check your battery acid levels and follow your manufacturer’s instructions. (For example, if electrolytes are low, you may add distilled water to some batteries if approved by the manufacturer). Stealth Max Pack Systems provides the digital volt meter for your comfort and thorough battery maintenance to recognize voltage drops. There are easy calculations you should know as a user. (12.65 per battery represents full healthy batteries) so 24 volt systems should be 25.3 VDC & 36 volt systems should be 37.9 VDC. Higher readings are a good thing up to 14.2 per battery. Above that there is a need to be concerned for the health of the batteries.
|
|
|
|
|